

Google Analytics makes it easier to track the results of all your marketing activities, including paid advertising, influence marketing, and SEO, in a more effective and precise manner. Basically;
- A greater emphasis is placed on user journeys
- Provides a user-friendly interface
- Gives improved analysis, reports, and data display
- Provides easier tracking.
In a word, all of this enables you to improve your content and reach your target audience more easily.
5 Quick And Easy Ways To Add Google Analytics To WordPress
There are many ways to add Google Analytics to WordPress. It can be done manually as well as by using Plugins. First thing you need to do is you need to sign up for Google Analytics. Once you’re done with signing up, the next thing you need to do is to add Analytics to your WordPress site.
- Use MonsterInsights
- Using a plugin, add the raw tracking code to the header of your WordPress site.
- In header.php, manually add the tracking code.
- In functions.php, manually add the tracking code.
- For performance reasons, sync Google Analytics locally.
Method 1: By using MonsterInsights plugin
The MonsterInsights WordPress plugin, a popular solution for embedding Google Analytics in WordPress, is the first method we’ll look at. The plugin not only assists you in setting up Google Analytics, but it also allows you to access key statistics without leaving your WordPress dashboard.
- Subscribe to a MonsterInsights plan and download the plugin to install Google Analytics on your site.
- Go to Plugins » Add New if you’d prefer start with the free plugin. When MonsterInsights appears, search for it and click Install Now, then Activate.
- To authenticate your blog with Google Analytics, go to Insights » Settings. Connect MonsterInsights by clicking the Connect MonsterInsights
- Select your Google account on the next screen.
- Allow MonsterInsights to handle your account after that.
- Finally, click Complete Connection after selecting the suitable website profile for your blog.
- After login, go to Insights » Reports to see how your website is performing.
Method 2: By using the “Insert Headers and Footers” plugin
- Log in to your WordPress dashboard.
- Go to Plugins » Add New, and search for “insert header and footer.”
- Select Insert header and footer from the Settings menu.
- To connect your Google Analytics account, you’ll need to paste your Google Analytics code into the header of your website.
- Log in to your Google Analytics account, then select Admin from the left-hand menu, then Data Streams.
- Next, go to your website’s data stream, scroll down, and select “Global site tag (gtag.js).“
- Your code is in the body text. Copy it, paste it into the header, and save it.
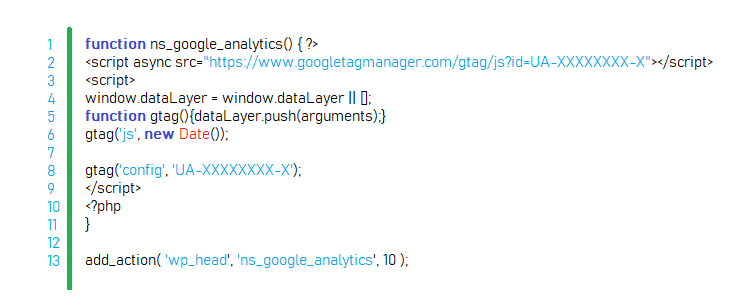
Method 3: By Adding Google Analytics Code to WordPress in functions.php Manually
Another option is to use functions.php manually.To do so, modify your theme’s or child theme’s functions.php file and add the tracking code as follows:
Method 4: By Adding the Tracking Code to header.php
Inserting the tracking code into the header file is one of the simplest ways to add Google Analytics to WordPress. It will then load on each and every page. If your theme uses the standard header.php file, this is an exceptionally suitable solution. However, keep in mind that using a child theme is the best way to go. Otherwise, a theme update will wipe off your adjustments.
To edit header.php, either open it in your main theme or copy it to your child theme folder and edit it there. Then, before the closing </head> bracket, copy the tracking code from your Google rel=”nofollow”Analytics account and paste it there.
Remember to include the <script> brackets so that browsers understand what you’re doing. You’re done when you save the file and upload it to your theme.
Method 5: By Syncing Google Analytics Locally for Performance Reasons
Another way is to sync the GA(Google Analytics) script on your own server locally. Please be advised that Google does not support this method.There are, however, a few reasons why you might desire to do so.
For starters, syncing GA locally can help you reduce the number of external HTTP queries you make. You’ll also have complete control over the file’s caching, allowing you to use your own server’s cache headers.
This is critical for bettering the website’s performance. If you utilize Google PageSpeed Insights, you may have noticed a warning for your GA script that says “Serve static assets using an efficient cache policy”.
The issue is that, GA has a two-hour cache time by default. This is most likely because if Google needs to make a change, it wants all users to be able to see it as soon as possible.
You can increase performance by changing the cache time by hosting the GA script on your own server.